Your liquid-cooled motorcycle relies on its cooling system every time you ride.
When should I change the coolant in a liquid-cooled motorcycle?
As a general rule of thumb, your liquid-cooled motorcycle’s coolant should be changed every two years or 24,000 miles, even if it looks good. Murky or brownish coolant should always be drained and replaced. Check your owner’s manual for your motorcycle’s specific coolant replacement interval.
Motorcycle coolant might also need to be changed for a day at the track. Trackday organizations may require that you drain your coolant and replace it with distilled water in case your system dumps across the course. These organizations may allow other additives, like Water Wetter, or they may allow a propylene glycol coolant, such as Engine Ice, for example, but not an ethylene glycol coolant. And they may have different requirements for advanced levels but not for beginner levels, so ask first and make sure you’re compliant with any track rules before you arrive.
When should I change the air in an air-cooled motorcycle?
Get outta here.
What’s in motorcycle coolant and why does it need to be changed?
Most liquid-cooled motorcycles use a 50/50 mix of water and antifreeze to evacuate engine heat through the radiator(s). Water is a fantastic choice for conducting heat. However, good ol’ H20 becomes a liability once temperatures drop below freezing. Antifreeze takes care of the ice problem, and different formulations may offer other benefits, like increased corrosion resistance or a higher boiling point. You’ll usually see ethylene glycol (toxic) or propylene glycol (non-toxic, but still worth containing) in standard antifreeze.
Over time, the coolant’s different ingredients can break down. Coolant can get pretty dirty, too, and reduced cooling performance can directly affect the health of your motorcycle.
Which coolant should I use? Can you use car coolant in a motorcycle?
Flip open your bike’s manual and see what coolant it wants. The manual will list coolant specifications that you can cross-check against the wide range of coolants available today. Do a little research to see what other riders are using for your particular model, and don’t get too hung up on selecting the perfect, highest-performing coolant. Just make sure you’re matching the specs in the manual.
As for “car coolant,” that depends. I’m going to assume that you're talking about the standard green stuff from Prestone, etc. If it meets all the specifications in your manual, sure, you can use automotive green stuff, avoiding silicates if you can. Just buy the right stuff and don’t risk your engine. On a related note, don’t assume that the green coolant in your bike is the same as the green coolant used in your car. Modern coolants come in a rainbow of colors that don’t necessarily mean the same thing from one formulation to another.

What tools and supplies do I need to change motorcycle coolant?
Not much! Here’s the complete list of what I’m using today.
- Service manual (for coolant capacity and model-specific instructions)
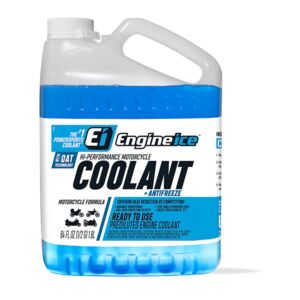
- Coolant. The FZR calls for 2.2 liters of 50/50 ethylene glycol-based coolant with corrosion inhibitors for aluminum engines. I’m using Zerex 675130 Asian Vehicle Antifreeze.
- A gallon of distilled water for flushing, or mixing with concentrate, if required. The Zerex is pre-diluted.
- New drain bolt crush washer
- Basic hand tools to remove plastics and parts
- Drain pan to catch the coolant, and a few rags just in case
- Rubber floor mat. Spilled coolant can make a mess on driveways, garage floors, and sidewalks.
- Small funnel

How to change your motorcycle coolant
Make sure your bike is cold before starting. Do not unscrew your radiator cap while the bike’s still hot! You’ll need access to the radiator cap, the water pump, and the reservoir tank. Break out the tools and dig in.

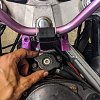
Position your drain pan under the water pump. Not sure where your pump is? Just follow the hoses. Locate your coolant drain plug, typically a small bolt at a low point on the water pump cover, and remove it.

Coolant will dribble out. Unscrew your radiator cap, and the flow should speed up significantly.


While you wait for the old coolant to drain, check your hoses for cracks or stiffness, then get your fresh coolant ready to go. Read your bottle carefully: pre-diluted coolant can go straight in, but otherwise you’ll need to mix the concentrate with distilled water. Avoid the temptation to use regular tap water, as minerals and other junk may not play nicely with your cooling system.
With the coolant mostly drained, stand the bike up and tip it from side to side to shake out any leftover coolant. I’ll usually fill the system with plain distilled water (hey, it’s cheap) and drain it again, and I always see a little color in the stream as it pours into the pan. This is especially important if you’re changing coolant types, since you should never mix different coolants. Say it with me: never mix different coolants.
If you’re replacing any coolant system components, like your thermostat or your hoses, now’s the time to do it. The FZR’s hoses are 25 years old now, so I’m swapping them out for a set of new silicone hoses from AS3 Performance.

The last required flushing job is the reservoir tank. Usually a clear-ish plastic container tucked near the engine or in the tail, you’ll want to remove any of your old coolant stuck inside. If you see some nasty sediment built up on the walls, remove the reservoir from the bike, plug up the hose connections, and pour in some isopropyl alcohol with a spoonful of table salt. Vigorous shaking will remove most stains and debris. Rinse with distilled water before reinstalling.

Install your new drain bolt crush washer and trash the old one. Make sure the old washer isn’t stuck to the bolt. Check your water pump drain plug torque specs and reinstall it. My FZR wants a mere five foot-pounds here, so this is not the time for gorilla strength or cheater bars.
Motorcycle coolant flush and radiator flush
If you want to flush your system of rust or scale before adding the new coolant, it’s probably best to avoid harsh chemical products. Try a 50/50 mix of vinegar and distilled water instead. Run the bike until the radiator fan kicks on, then turn the bike off and let it cool to room temperature. Drain the vinegar/distilled water mix out, flush the system again with only distilled water, and drain once more. Flushing is recommended for neglected or unknown cooling systems. Otherwise, it’s reasonably safe to just skip it.

Adding the coolant
At last, you can pour that fresh coolant into your cooling system’s filler neck through a funnel. Cut down on spills by pouring slowly into the funnel, then pausing to listen for the gurgling sound of the system filling. Start pouring again when the sound stops. Squeeze the coolant hoses and rock the bike from side to side to eliminate air bubbles.
Your motorcycle may take less than its full capacity when you first fill it, but don’t worry. Once the system’s full, leave the radiator cap off and run the bike for a minute. A few quick revs should shake out any remaining air bubbles. Turn the bike off, recheck your levels, and add coolant as necessary. Fill the reservoir tank to the full line (mine's on the backside), put the radiator cap on, and you’re ready to ride! I typically re-check the coolant level in the reservoir tank after the bike’s next journey just to be sure that everything’s copacetic.
How do I dispose of motorcycle coolant?
Coolants should never be poured into the ground or down the drain, even if they claim to be environmentally friendly. Do not leave open containers of coolant lying around, especially if it's ethylene glycol and especially if you have pets. Dogs seem to like the taste of coolant, for whatever reason. Save Mother Earth and Fido by bottling up your old coolant and dropping it off at your local auto parts place or recycling program.