Overfilled oil, stuck oil filters, and just making a general mess are common concerns for people tackling an oil change on their motorcycles.
Fair enough, but those worries shouldn’t prevent folks from DIYing the most basic of maintenance items, so I’m here to help address — and ideally help you avoid — these top issues.
Too much of a good thing
Oil is an engine’s lifeblood, but too much oil may actually lead to a lack of lubrication since the crankshaft can beat the fluid into an unpumpable froth.
If you’ve overfilled your engine oil, you have a couple of options for removing the excess. The easiest thing to do is to pull the drain plug for a moment to bleed off some fluid. Alternatively, you can use a turkey baster or large syringe and length of hose to suck oil out via the filler plug. Or, the pump handle of a large spray bottle works well, and has a built-in straw that’s long enough to get down into the engine.

Ultimately, the best solution for overfilling your oil is to not do it in the first place. Start by knowing the volume your bike needs – it might be printed right on the crankcase but it’ll definitely be listed in your manual. Just make sure you’re using the volume for the oil and filter, and not the full engine rebuild volume, which is going to be more. Then, either measure the oil in a separate container or mark the bottle at a level that is slightly less than the total volume needed, and pour it in. From there, slowly add oil a little at a time until it’s within spec.

Regardless of the recommended volume, the final height check should always be via the dipstick or sight glass, after you’ve run the engine and let the oil settle, of course. And as far as whether to set the level at the top or bottom of the range, as long as it’s within the hash marks on the dipstick or between the lines in the sight glass, you’re good. I usually aim for the middle, and if your bike burns a little oil you might as well start it out on the high side, but as long as it’s between the lines, it’s within spec.

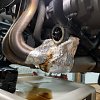
Stubborn oil filters
Over-tightened oil filters are a common obstacle for DIYers, but the first thing I’ll say here is that it’s counterclockwise to loosen… I know, I know, but the placement and perspective on the oil filter can throw people off. I’ve been susceptible, too.
If you’re sure you’re turning the filter the correct direction and it just won’t budge, you’ll want to get your hands on some form of filter wrench. There are universal strap wrenches as well as universal pawl wrenches that work pretty well, and of course there are oil-filter sockets in specific sizes that provide a secure grip plus plenty of leverage via a three-eighths-inch ratchet.
Any of those wrenches are worth investing $10 in, but none of that helps you if you’re reading this while lying on your back in the garage, so another option is to use a big-ass set of channel locks or even a pipe wrench to grip the filter and twist it off, assuming you’ve got enough room to get the tool in there.

Finally, if you don’t have a filter wrench or channel locks, you can go psycho on that sucker and stab it with a screwdriver. I’m not kidding. Place a Philips about an inch and a half up from the base — so you miss the threaded lug that extends off the engine — and then drive it all the way through with a hammer. Use the leverage of the screwdriver to twist off the uncooperative filter. This is a messy and brutal method, so it’s definitely the last resort.
Making a dirty job less messy
Following that Exxon Valdez of a mess, the third most-asked question is how to avoid getting lube everywhere while changing your oil.

For starters, put cardboard down. Not just under the bike, but all around it. That way the inevitable drips and splashes won’t get on your garage floor or driveway. Cardboard is free, whether you snag it out of the recycling bin or save boxes from your last RevZilla order, and nobody has ever regretted putting too much of it down.
Other tips for keeping clean are to wear nitrile gloves and wipe drips up as soon as they happen so the oil doesn’t spread. This might seem obvious, but use a funnel to pour oil into your engine and to refill the bottles with used oil for recycling. You can do an oil change without a funnel, but having one really makes the job easier and helps prevent spills.
That being said, accidents happen. If things have really gone off the rails and you have a small pond of oil spreading across your driveway (I’ve definitely started refilling the engine before installing the drain plug), the age-old cleanup material is kitty litter. Dump it on the mess, grind it in with your shoe, and sweep it up. Sand works too, but isn’t nearly an absorbent.
Unfortunately, there’s no escaping the mess of oil residue during an oil change. You’ll likely get it on your forearms, on your tools, on your funnel, and dripping down the bottle on your leftover oil, and it won’t magically disappear if you ignore it. In fact, it’ll stick around, spread, and attract grime. So the key is to clean it all up.

There are plenty of degreasers and cleaners out there, but my secret weapon is good old rubbing alcohol. Isopropyl alcohol is a super effective solvent, you can get it for cheap at any grocery store or pharmacy (CVS even sells it in a spray bottle now since it’s become such a popular sanitizing solution), and it’s not noxious or damaging to plastic, painted surfaces, or your skin.
Oil changes are usually straightforward, but there are certainly some hurdles or missteps that can make the job frustrating. The problems I've outlined are fairly easy to avoid if you read your workshop manual and go about the oil change in a careful way, but hey, nobody is perfect. At least now you know how a spray-bottle handle, aluminum foil, a screwdriver, or a box of kitty litter have the potential to save the day.