
Twisting the throttle is a fundamental joy of riding a motorcycle, but as with any moving part on a bike, your throttle and throttle cables need to be maintained.
Don’t worry, there’s nothing too complicated about tending to your biker’s loud stick and associated parts. In this article I’ll outline how to inspect and maintain your throttle as well as how to replace the cables if, say, they’re worn out or are too short for that new handlebar you’re installing.
What to inspect, and how often
Glance over the maintenance chart in your owner’s manual and you’ll see “Throttle Operation” or “Throttle Cables” listed as an inspection you are supposed to perform every several thousand miles.
It’s a pretty simple checkup that starts with the throttle tube: Make sure it rotates smoothly and snaps closed when released. Next, check the throttle freeplay, which is the amount of rotation before it starts pulling on the cable. The spec usually falls within the range of three to six millimeters, as measured at the outer diameter of the grip. Lastly, visually inspect the cable housing for damage or kinks that could impede the cable’s movement, and look closely at the exposed portion of inner cable to see if it’s fraying or corroded.
If throttle freeplay doesn’t measure up
More often than not, everything is groovy except the throttle freeplay, which usually increases over time. Ugh, few things make a bike feel less precise than a sloppy throttle.

To alter the freeplay, use the barrel adjuster on the throttle cable where it leaves the throttle housing. Loosen the locknut and turn the adjuster in or out to achieve the desired freeplay. If the adjuster is maxed out, turn all the way in and then take up the majority of the slack at the throttle-body end using the locknut and adjuster there. Then fine tune the freeplay using the barrel adjuster up at the bars.
Side note: Modern bikes have two throttle cables — a “pull” cable that opens the throttle plates and a “push” cable to close them. Technically both cables pull and the throttle plates are closed by a spring, but the “push” cable is there as a backup so that if the spring fails or the throttle plates stick for some reason, you can forcibly shut things down. Typically, only the “pull” cable is adjustable and you can more or less ignore the “push” cable.
If throttle action feels gritty
If the throttle action feels rough or sticky, the throttle tube and/or throttle cables may need lubrication. Interestingly, some workshop manuals specify lubricating these components as part of regular maintenance, while others only mention it as a remedy for improper operation. Some cables use coated inner wire (see photo below) that makes lubrication unnecessary.
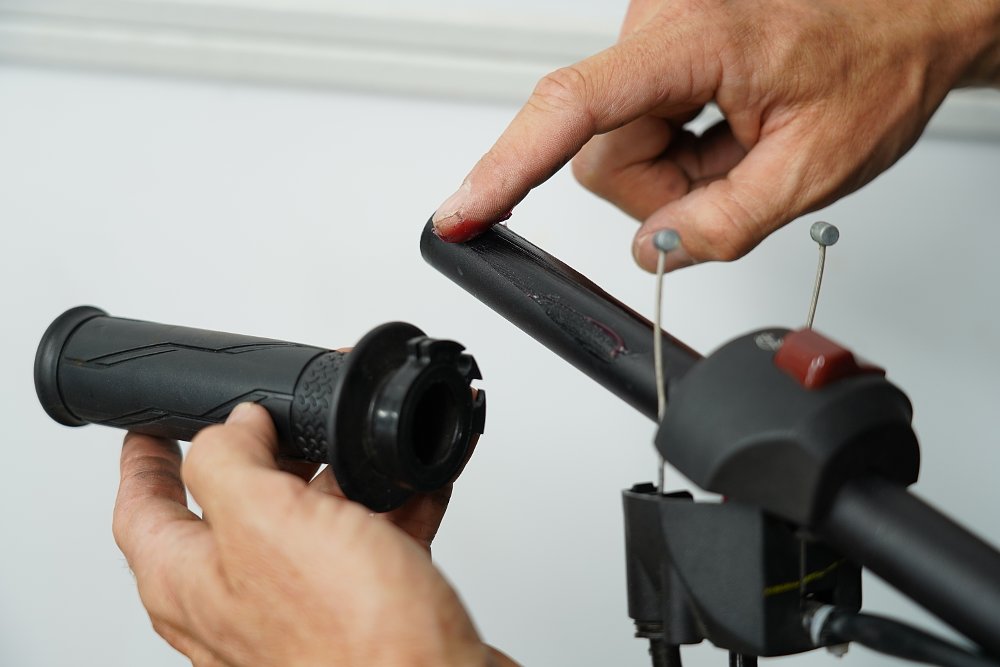
To service the throttle tube, remove the bar-end weight, loosen the barrel adjuster on the throttle cable to provide plenty of slack, disassemble the throttle housing (it’s usually held together by two screws), unhook the cables from the throttle tube, and slide the tube off the end of the handlebar. I know, easier said (read?) than done.
My go-to for degriming most parts is a rag doused in WD-40 or rubbing alcohol. Using something similar, clean off the bar and the throttle tube, then apply a thin layer of multi-purpose grease to the bar and slide the throttle tube back on. It should spin smoothly now.
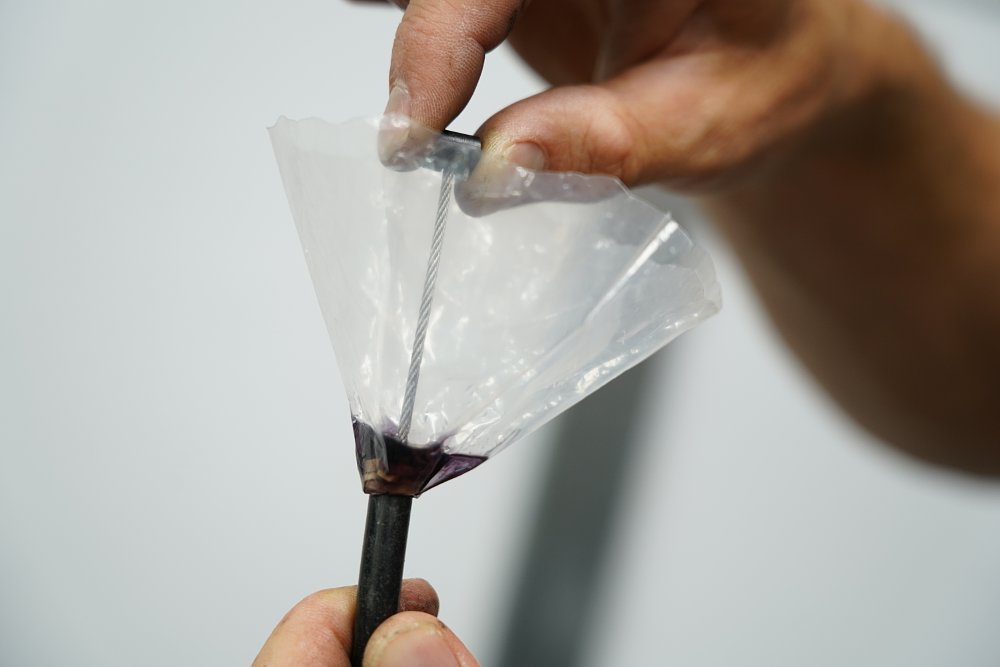
Since the throttle is already apart — and since the throttle tube might not have been causing the problem in the first place — now is a good time to lubricate the cables. You can either use a specialty device to inject an aerosol lube into the cable housing, or you can make a funnel out of the corner of a plastic bag. Nip a hole in the corner, secure the makeshift funnel to the end of the cable with a rubber band, and then fill it with lube (regular motor oil works) and stroke the cable up and down to get the stuff moving down into the housing.
Again, some manuals suggest lubing the cables regularly while others don’t, and I’ve heard varying opinions from riders as well. Those who ride in dusty conditions sometimes prefer to leave their cables dry to help avoid attracting grit, while riders in wet climates know it’s important to keep their cables well oiled and thus protected from corrosion.
Regardless of which approach you take, the fact is that control cables are consumable parts, which brings us to…
Replacing your throttle cables
If your inspection reveals any damage, you’ll need to replace your throttle cables.
You might also need to replace them to accommodate a different handlebar. If you’re switching to lower controls you can usually cope with the extra cable slack, but when going taller odds are you’ll need longer throttle cables, as well as a longer clutch cable and possibly a longer front-brake hose. Keep that in mind when contemplating new bars, and do your research to see if the stock stuff will work for your new setup.
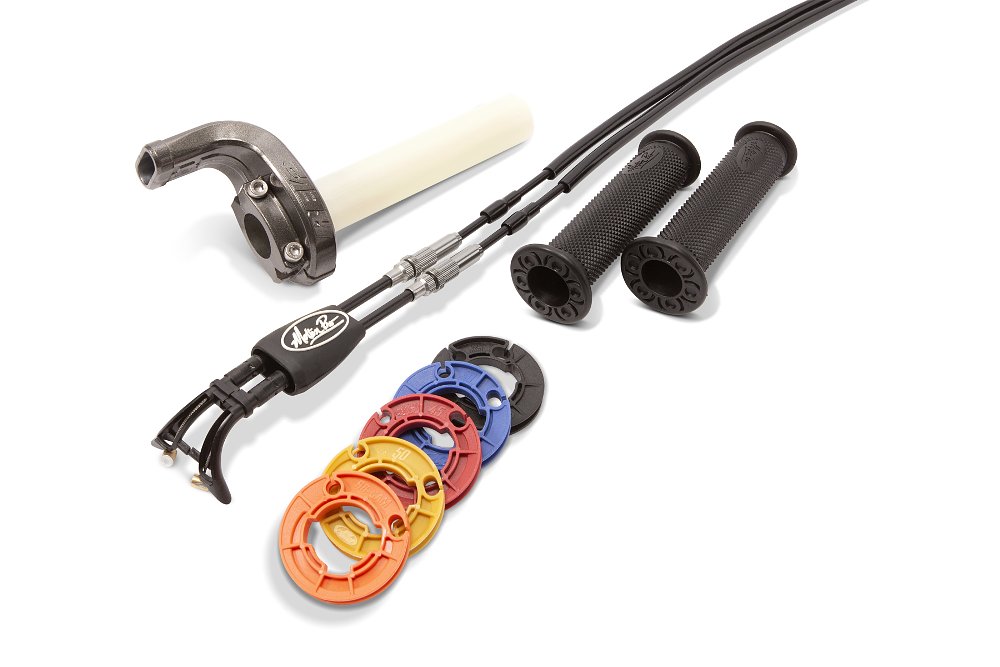
In any case, when it comes to getting replacement cables, you can stick with the OEM parts or get aftermarket (and custom, if you need an altered length) items from companies like Motion Pro or Barnett. Motion Pro also offers various throttle kits if you’d like to alter reel size for quicker or slower throttle action. I’m a fan of the Rev2 throttle kit and have installed it on many of my race bikes.
When installing cables, the biggest hurdle is routing. It’s important to follow the original path exactly to avoid pinch points, hot engine parts, and other threats.
Before you do anything, snap some photos of the cable routing, just for reference. Then disconnect the cables at the throttle housing and down at the throttle body, which may be buried under your tank. (Sorry.) Now it’s just a matter of unclipping any zip-ties or tabs securing the old cables and pulling them out while chasing them with your new parts. Secure the new cables in the same manner as the old ones, hook them up to the throttle and throttle body, reset your cable slack, and you’re good to go.
Keep in mind that cables don’t come lubricated, so if you’ve decided you’re in the wet-wire camp, feed some oil into the cable housings before buttoning everything up.
As a final check after installing new cables (especially if you’ve installed a new handlebar of a different height), it’s a good idea to start the bike and swing the steering from lock to lock. If the idle rises, that means that the cables are getting pulled. You’ve either got them routed wrong or you don’t have enough freeplay at the throttle. In either case, you’ll definitely want to remedy the issue before riding the bike.
And with that not-so-brief read, you’re up to speed on the care and feeding of your throttle and throttle cables. We all love twisting the throttle, and making sure it’s maintained helps ensure you can keep doing it without trouble for miles to comes.
Image Gallery


