Pulling a valve out of a head is easy-peasy. Putting it back in is only slightly harder.
Here's what you need to know.
Why
Fearless Editor Lance has this crazy editor thing he does where he keeps asking me why someone might want to do something every time I suggest a how-to article, and then he makes me write that into the article. So if you’re not standing in your garage with a cylinder head (or a jug, if you’re working on a sidevalve) sitting next to you, you might want to know a few of the reasons you might be compelled to remove yer valves:
- Installing hot-rod parts like heavy valve springs
- Replacing leaky valve seals
- Replacing valve seats or guides
- Grinding or lapping valves (It’s controversial as to whether or not you should be lapping, but in any event, doing it requires valve removal)
- Repairing a cylinder head casting (or a jug, in the case of a flathead)

The quick-and-slightly-dangerous way to remove a valve from a cylinder head
As a young man, I was shown a way to get valves out of a head quickly. This way involves zero specialty tools. First, put your head’s gasket surface onto a non-marring surface. (Scrap lumber works great for this.) Locate your head somewhere where the valve can’t drop very far so it doesn’t get damaged.
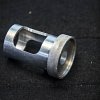
Place a deep-well socket that’s similarly sized to the valve spring collar on the collar, centered carefully. Smack your socket with a mallet, and the valve locks (keepers) will slip out of their grooves, freeing the valve. The collets will be contained by the socket; when you lift it up to peek at the valve and spring, the keepers will usually fall right out.

Cons of this method: Smacking things can get ugly and things can be broken. There is also some concern with a spring under tension suddenly releasing all its energy. And if you are also responsible for reinstalling the valves, there’s like no way possible to reinstall using the same toolset.
Pros of this method: You won’t break things if you’re not a complete gorilla, and even if you do, if the head is getting renewed anyway, so it is of little consequence. Also, it’s fast. If you’re doing one little two-valve head, the proper way does not take very long. However, on a 16-valve, inline-four head? You can do this in under five minutes. The “right” way will take considerably more time.
Would you do it, Lem? I have. I use the right tools when I can, but I wouldn’t look down my nose at someone who did this. That said, if you cherish your cylinder heads, here is the less risky method for valve removal.

Step one: Remove the cylinder head
As mentioned previously, this part sucks a little bit. Take apart half your bike. Probably the tanks. Exhaust. Intake. Get the cam(s) or rocker shafts out once you extract the head. This is the easiest step to write but it’s probably the most time-consuming part of this process.

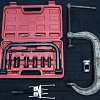
Step two: Select your tools
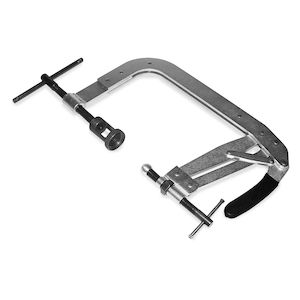
There are lots of spring compressors. You can make or buy or some combination of the two. If you’re making, C-clamps come in handy here. If there is any advice I can give you, it is this: the larger the access window is in the tool, the easier your life will be.

Different valves, and heads/jugs require different tools. There are a few styles. Not every tool is compatible with every head/jug. The automotive ones that screw into a rocker stud are particularly useless for motorcycle work.
I also like to have a right-angle transmission pick and small magnetic flathead screwdriver handy.

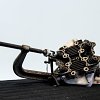
Step three: Set up the compressor
Center the two points of attachment at the top and bottom of the valve. Don’t score up the valve face if you can help it, and line up the collar fork/pusher concentrically with the collar.
As you tighten things, the pressure will make it easier to maintain the position, then as you really screw on the pressure, it will become quite difficult.

Step four: Crank it down
Compress the spring, making sure things are compressing and the tool is not moving or slipping. Once you’ve got the spring compressed far enough, remove the valve locks and seals if you desire. Then start decreasing the spring pressure, and your valve should either fall out, or a gentle tap from a finger should free it. Make sure you label which valve went where if not fully reconditioning the head.

Step five: Reinstall
This step will likely be performed after your additional work has occurred. You’re basically just repeating the process, but inserting the valve keepers at the end, rather than removing them. Protip: A dab of grease on each keeper will help them adhere to the valve’s stem, then you can use your picks to rotate them where you need them. A screwdriver with a weak magnetic tip can also make this part go a bit more smoothly. This is the fiddliest part of the job.

The smaller your window in the collar pusher you have, the worse the task. I find a little light can make this part easier, too. Once they’re in place, back the pressure off, double check they’re in place correctly, and repeat, returning each valve to its proper spot.