

Motorcycle graphics live hard lives. Sometimes, replacing them can completely refresh the look of your machine.
Motorcycles ridden off-road typically see the worst damage, and that’s an accepted part of venturing beyond the pavement. It’s easy to find replacements for the popular dirt bikes, dual-sports and adventure bikes out there.
Of course, road-going bikes will see wear and tear to their graphics and decals, too. From a scuff in the garage to a lowside at the track, there are plenty of ways to damage factory and aftermarket adhesives, and there should be plenty of replacement options if you’re riding something common.

This article is geared towards the cheapskates, do-it-yourselfers and owners of odd bikes who want to refresh their bikes but either can’t find replacements or refuse to pay big money for simple pieces. For example, Yamaha wanted $80 per side to replace my FZR600’s tail number plates. I really do appreciate that they still have those decals in stock 25 years after my bike was made, but I’d rather put that money towards other parts and leave the OEM ones for someone doing a full-on restoration. So, I learned to make my own, then started using that technique to spruce up other bikes.

On the bench today, we have a left side cover from my KDX200. You’ll notice the white section is in great shape aside from a tear and some wrinkling. While I’d normally just leave it and keep riding, I want to enter the bike in an upcoming show, so I’m replacing it. As a wise friend once told me, you have to limit your perfectionism around dirt bikes, or you’ll go crazy and broke! Thankfully, this is a quick job once you've got the hang of working with vinyl. Let’s get this thing show-ready with a little time and very little money.
What is vinyl wrap, what can it do, and what can’t it do?
Vinyl wrap is available in a wide range of brands and styles, though the basics are the same. One side is the “show” side, the other side is sticky. The vinyl can be peeled off at any time with very low risk to the underlying finish, and if you’re careful, the vinyl can be repositioned and applied again.
Vinyl wrap is fairly stretchy and forgiving, especially in the presence of heat, although it does have its limitations around very sharp corners or funky curves. Most motorcycle graphics are not that complicated, so you shouldn’t have too much trouble applying vinyl wrap by yourself. It can be nice to have a friend’s assistance when laying down the vinyl.
I tend to stick with 3M’s 1080 series of vinyl wrap. The largest project I ever did with it was a car roof, and it was surprisingly easy to work with at that scale. 3M 1080 seems to be about as durable as OEM stuff. It’s easy to work with and widely available. Use it to make a replica of something damaged or make a design of your own.
So now you may be wondering, Why can’t I wrap my whole bike in vinyl? Actually, you can. Wrapping an entire motorcycle can be a lot harder than just doing simple stuff, so it’s beyond the scope of this article. If you want to try wrapping a whole bike one day, maybe start here for some practice!
Necessary materials
To make your own vinyl graphics, the basic materials are vinyl wrap, a hair dryer, sharp scissors, a hobby knife with a fresh blade, and rubbing alcohol. If you want to make things easier on yourself, I recommend some extra tools.

A heat gun works much better than a hair dryer, in my experience. I also use a squeegee tool that came with one of my vinyl orders. It’s just a plastic card with a felt edge for smoothing the vinyl surface.
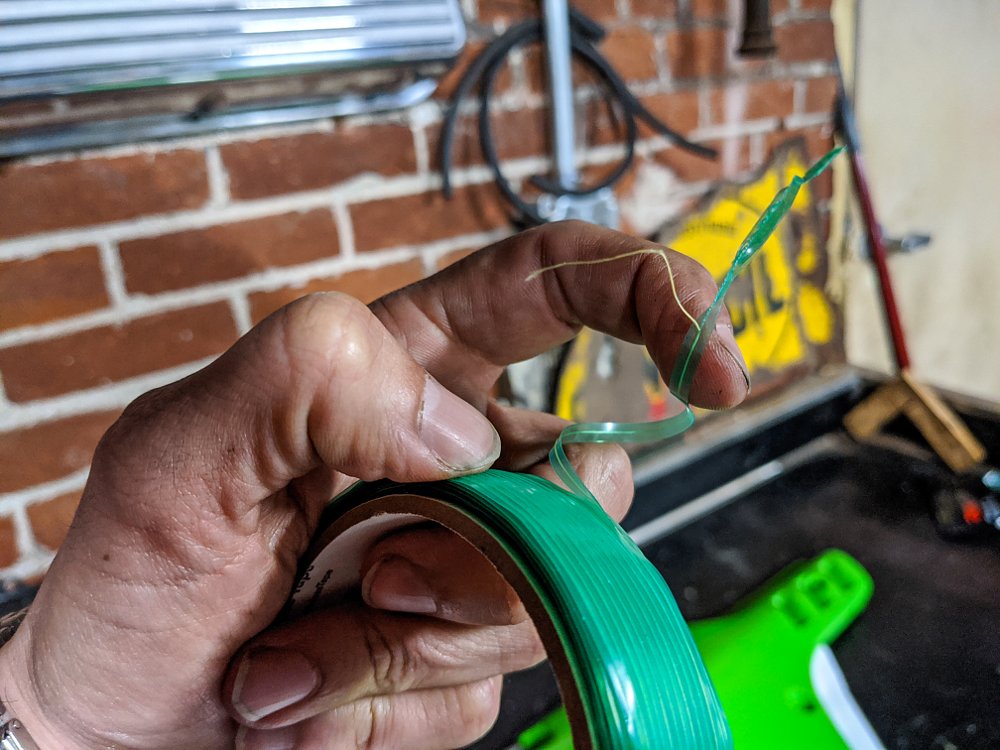
One last extra tool is a 3M product called knifeless tape. Instead of cutting into the work with a utility blade, knifeless tape positions a thin “wire” under the vinyl surface. Pull it up and out through the vinyl surface, and the filament cuts the vinyl to shape without damaging the work. You’ll see how that works in a bit. First, let’s get prepped for this project.
Preparation
Three kinds of preparation here, folks. First is preparing your work’s surface. It’s easiest to apply wrap off the bike, so remove the part if possible. Make sure to take pictures before removing everything! You can also trace your old design with some layout paper, or you can carefully outline the old graphic in masking tape or knifeless tape before peeling it off.

Wash the part’s surface, peel off any old graphics, and go over everything with rubbing alcohol until it comes up clean. When you think you’re done, clean it one more time!
As for your materials, just make sure you have sharp cutting tools. Trimming vinyl with a dull blade will only lead to sadness.

Finally, prepare your workspace by cleaning it thoroughly. Any dirt that makes it between the vinyl and the work will be visible as a raised bump, and that just looks amateur, so clean your space, and don’t forget to wash your hands before you start.
The process of applying vinyl
Approximate the size of your final design and cut the vinyl sheet to size with the scissors, adding at least an inch extra on all sides. Two inches would be safer.

If you're opting to use the knifeless tape, draw your design out with it, pressing firmly as you go to make sure the tape stays put. After creating your shape, make sure to leave a tail so you can work the filament loose later. It's time to apply the vinyl.

Carefully peel the backing away from the adhesive side, making sure the vinyl doesn’t stick to itself. (If that happens, you can usually pull it apart. Best to avoid the situation altogether.) I find it’s easiest to start in the middle and work my way out. Press the vinyl against the work to adhere it, working slowly and smoothly to avoid air bubbles. If you need to pull the vinyl back and try again, work it slowly and don’t overstretch the material. More stretching means more distortion, and that makes it even harder to get right when you try again. Keep working the vinyl out towards the edges, which you may have marked with masking tape earlier. You’ll be able to find the edge of that tape once you lay vinyl over it, which makes a nice line to follow later. Pesky air bubbles can be popped with a needle and flattened, if necessary.

When the wrap just doesn’t want to cooperate, bring the heat! Start with your hair dryer or heat gun’s lowest setting. Warm the vinyl until you feel it get stretchy, and start pressing it down right away.

Stretching and heating will stress the vinyl, or ruin it if overstressed. I would definitely use heat for sharp corners, complex curves, or any kind of vent, scoop or louver feature.

Once the vinyl is in place, it’s time to cut it to size. Those of you using a hobby knife or utility blade, use light pressure to cut the vinyl to reduce scoring. This is more critical for painted bikes. It’s not a big deal if your dirt bike’s plastics get a few more scratches, right?
Use the knifeless tape for the safest, least destructive option. I recommend following the included directions exactly. Here’s a great video from 3M with some tips for using it.
Now that you’ve cut your vinyl to size, you might need to make some final adjustments. Use the sharpest blade you have and trim any irregularities. This is also the time to cut around the holes where fasteners pass through your part. On the KDX, I had two holes to cut. I cut into the vinyl with a fresh utility knife and laid the blade at an angle, with the tip in the center of the circle, and the edge resting on the plastic. By keeping a consistent angle, I sliced around the hole and ended up with some surprisingly round cuts.

Can I say it? Can I please say it?
...That’s a wrap! Treat your vinyl like a factory graphic. Wash it gently when dirty, don’t blast it with a pressure washer, and keep it protected from the elements for the longest life. Try to wipe away fuel spills as quickly as possible.
All in, this decal used about five dollars in supplies and took me about 15 minutes to make. I just keep a big roll of white vinyl around at this point. I’ll probably get some school bus yellow wrap, too, for AHRMA race plates. The price per square foot is much cheaper if you spring for the larger sheets.
Hopefully, this guide gets you thinking about an easy way to restore or change up your motorcycle. Vinyl wrapping is inexpensive and fun, not to mention rewarding when the job comes out the way you imagined. Good luck, and drop any projects or questions in the comments! I’d love to see your wrap project, or help troubleshoot any problems.


