

Buying a chain and sprockets for your motorcycle can be like visiting the cereal aisle at the supermarket — there are too many choices! From chain size and seal style to sprocket material and master link type, there are a lot of decisions to make. So, here’s my attempt to demystify the options you’ll face when replacing your drivetrain.
First, we need to get one thing out of the way.
The chain tends to show its age before the sprockets, but know that the chain and sprockets wear as a set, so they should be replaced as a set. If you’re not sure how to assess your drivetrain’s health, spend four minutes watching this video and you’ll be fully informed.
As tempting as it is to throw a new chain on used sprockets because they don’t look that bad, it’s a recipe for excessive noise and rapid wear. It’s not worth it, especially considering how affordable sprockets are compared to a quality chain.
Chain choices
On the topic of chains, you’ll want to make sure you’re shopping for the correct size. Usually, it’s printed right on the side plates. Common sizes are 520, 525, and 530. They all have the same pitch, which is the distance between the pins, but they have different widths to match engine outputs. Match the size that’s on your bike and you’re good.

After size is type, and by that I mean sealed or unsealed. Unsealed chains, commonly known as standard chains, are typically quite affordable (as in sub-$50), but they require frequent lubrication and adjustment, and even then will only last a few thousand miles. Standard chains are still common on small bikes (think Honda Grom) and some off-road machines, but they’re not what I’d recommend for your daily rider street bike.
The next step up, and the lowest grade I’d recommend, is a sealed or O-ring chain. Sealed chains have rubber O-rings sandwiched between the side plates that keep lubricating grease in and water and dirt out, so they’re a lot more resistant to wear. It’s likely what your bike came with and it’ll last many times longer than an unsealed chain. They typically cost about $100 to $150.

Then there are W-ring, X-ring, and all sorts of end-of-alphabet sealing technologies. These are more complex and refined gaskets that offer a better seal with less drag, so these chains are more efficient and more durable. These are considered premium chains, and often have bells and whistles like lightened side plates and fancy finishes. As a result, W/X/Z-ring chains will run you from $150 to $250-plus.
Price is actually a pretty good indicator of the chain type, but read the product description to determine what kind of seals it has, if any, because many brands use confusing or suggestive postscripts in the chain’s model name. Speaking of names, stick to name brands like DID, RK, EK, Vortex, and Renthal. Off-brand chains may seem appealing because of their price, but they’re cheaper for a reason.

After you’ve decided on the chain size and type, you’ll be faced with another decision: Length. Length is listed in links, and common options are even numbers like 108, 110, 112, etc. If you have an owners manual, it’ll likely list the length, or you can ask Google, or even count the links on your current chain.
Now for the master link, which many people overlook. Your new chain should come with a master link (check to make sure), and it will either be a clip type or a rivet type. Here’s the deal: clip-type links are easy to install and don’t require any special tools beyond a pair of pliers, but they’re not as secure as rivet links since the clip can potentially pop off.
Rivet links, on the other hand, are permanent installation, and what most street bikes use. Rivet links require a chain breaker/riveter tool to press the side plate on and mushroom the ends of the link pins. You can also use the tool to remove your old chain (as opposed to wielding a cutoff wheel) and you can use it to shorten longer chains, so I think it’s a worthwhile thing to invest in. Then again I’m a tool nerd.
Final thing about chains, I promise. Some of them come slathered in white lithium grease. It’s left over from the grease bath the chain gets during assembly, and riders wonder whether to leave it on or wipe it off. I suggest cleaning it off before installation unless you want to wipe it off your rear wheel and bodywork later.
OK, chains discussed ad nauseum. Now it’s on to the sprockets.
Sprocket selection
For the rear sprocket, you’ll often be faced with a choice of aluminum or steel. Always, always, always go with steel for the street and even dirt use. Aluminum is appealing because it is so much lighter and you’ll save a bunch of rotating, unsprung weight, but aluminum will wear out in a fraction of the distance — likely faster than your rear tire. If you’re committed to shaving weight then you can get a SuperSprox, which has a steel sprocket ring on an aluminum carrier. It’s the best of both worlds, but it’s a $100 part instead of, say, $45 for plain steel. It’s up to you whether a few ounces is worth it.

Now for the front sprocket. Sometimes there’s confusion because your OEM sprocket likely has rubber molded onto it, and the aftermarket replacements you’re looking at don’t. The rubber is there to cushion the chain and to reduce noise. It's not necessary, and you’re unlikely to find it on aftermarket sprockets due to weight, cost, and complexity to manufacture.
Another thing to consider with replacement sprockets is tooth count. If you want to keep things simple and not risk throwing off your speedometer accuracy, I’d recommend sticking with the stock figures. You can check your manual for the front and rear tooth count, or it’s usually stamped right on the side of the sprocket, and of course you can count the teeth if it comes to that.
Too much of a good thing
Choice is good, but as you can see, the number of choices associated with replacing your motorcycle’s chain and sprockets can be overwhelming. Hopefully now the options make sense.
If you struggle to make decisions or just like to keep things simple, know that you can always opt for factory replacement parts, or an aftermarket chain-and-sprockets kit that’s tailored to your bike.
Image Gallery

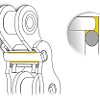
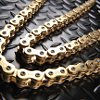
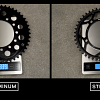
Image Gallery
