Even if you don’t consider yourself a motorcycle mechanic, there are a number of maintenance items you can do yourself. Replacing your brake pads is one of them. It’ll save you money, and it doesn’t take much in the way of tools, time, or skill.
You might be open to the idea of DIYing a brake job on your bike, but how do you know if your brake pads need to be replaced in the first place? Unlike cars, motorcycles don’t typically have an audible wear-indicator (known as a “squealer” due to the sound the metal tab makes when it contacts the disc), so you’ll need to visually inspect the parts to check their condition.

On most motorcycles, that’s as easy as taking a knee next to the caliper. From the right angle (usually the front) you should be able to get a clear view of the pads where they contact the disc. Some pads have grooves that serve as a wear reference, but if there’s less than two millimeters of friction material projecting off the backing plate (about the thickness of a nickel) you should get some new pads on order.
All jobs, even easy ones like this, call for some supplies. You’ll need whatever tools are required to remove the caliper, brake pads, and the lid on your brake reservoir, as well as an old toothbrush and some soapy water for cleaning the caliper, some nitrile gloves, and of course plenty of rags. As with any procedure, a headlamp is also super handy.
If your brake pads are retained with a threaded pin or plug, crack that loose while the caliper is still firmly attached to the fork. Sometimes these bolts are pretty corroded, so feel free to apply a little penetrating lube, and give it time to work. I’ve seen plenty of brake jobs come to a screeching halt before they even start because someone strips the head of a rusty retaining pin.
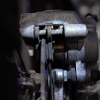
Now unbolt the caliper from the bike, and right away, take some pictures of it from a few angles. There aren’t a lot of pieces within the caliper, but they install in a specific way that isn’t always intuitive. The spring plate orientation in particular often puzzles me during reassembly, so it’s handy to have some photos to reference later.
Remove the pad-hanger pin or other retaining hardware and the pads should just slide out the the caliper body. Note that there may be shim plates or insulators on the back of the pad. These serve to reduce heat transfer, vibration, and noise. Some bikes have them, some don’t, and some aftermarket pads won’t fit into the caliper with the shims installed, so don’t feel obligated to use them.
Set all the retaining hardware aside and take a look at your old pads. The friction material should be evenly worn across the surface. If it’s significantly thicker at one end than the other, that may mean you have a caliper piston that’s not moving freely, a notched pad-retaining pin, or, if you have slide-pin calipers, the pins and collars that allow lateral movement of the caliper may need to be greased.

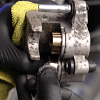
As your pads wear down, the pistons extend, and you need to push the pistons back in to fit the new, thicker pads. However, the pistons are likely dirty, so it’s important to clean them before pressing them home. Use an old toothbrush and a mild detergent like Simple Green or dish soap to clean things up. This isn’t something most people bother to do, but it’s an extra step that’ll help ensure your brakes work properly.
Often you can push the calipers in by hand. Before you start squeezing though, remove the brake-fluid reservoir cap, since pressing the pistons in is going to force fluid back up into the reservoir. Keep an eye on the fluid level, and wick off excess fluid with a paper towel or your reverse-bleeding syringe.

With the pistons pushed home, install your new brake pads, making sure the pads and spring plates are in place and the retaining hardware is properly installed. Then, with the pads spread, slide the caliper back into position on the disc, install the bolts, and tighten them to the appropriate torque.
Finally, pump the brake lever to push the pads against the disc, then check your fluid level and reinstall the reservoir cap. Your new pads will need to bed into the disc, so plan on riding gently for 15 or 20 miles, with progressively harder braking as the miles accrue.

And that’s all it takes to tackle a brake job on your motorcycle. There are other ways to expand the job — such as scouring the discs with a Scotchbrite pad, replacing the brake fluid, and cleaning/greasing slide pins, if present — but that’s the basic rundown. It’s easy enough that anyone can do it, even if you wouldn’t exactly call yourself a mechanic.
Image Gallery