


"Feel free to give it a good long-term beating before putting pen to paper,? said Chris from RevZilla, when he asked me to test some gear from a ?real-world perspective.? I may have taken that a bit too much to heart.

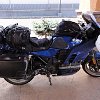
That's my BMW, loaded and on the road. Photo by Yermo Lamers.
It was back in March, with a foot of snow still on the ground, when the Kriega UScombo40 Drypack System landed on my doorstep. Since then, I've taken these bags 8,000 miles across country, through epic rain, incredible winds, and sand-blasting dust storms. They also accompanied me on a separate, 2,000-mile ride to the Smoky Mountains in June, through much more rain. All told, I've lived with these bags daily for a period of five weeks on the road.
How I use the Kreiga UScombo40 Drypack System


The “US” in the name stands for “Universal System,” and the bags seem to be targeted at sportbike riders, who have fewer luggage options. So I'm probably not the target demographic. For this evaluation, I used the Kriega bags in place of my seat bag, so I needed to mount and remove the bags daily, but rarely needed to get into them during my riding hours.

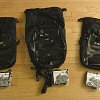
The Kriega UScombo40 Drypack System combines three Kreiga bags. Photo by Yermo Lamers.
First impressions of the Kreiga UScombo40 Drypack System
The Kreiga UScombo40 Drypack System is a three-bag system. The central, 20-liter bag mounts to the bike and the two 10-liter bags are mounted to loops on the sides of the center bag. The center bag can also be used alone.

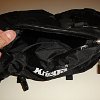
The bags have a white interior to make it easier to see inside. Photo by Yermo Lamers.
The bags themselves resemble very sturdy stuff sacks and are black with a white interior lining. The material feels very substantial. There is some kind of additional panel sewn into the top and bottom sides, which adds just a touch of rigidity, and seems to make getting things in and out of the bags easier.

Zippered, waterproof compartment, above, and mesh compartment, below, are some of the system's features. Photos by Yermo Lamers.

There is a zippered, waterproof compartment on top of each bag and a substantial mesh compartment on the bottom of each bag. It's zippered on the 20-liter bag and open-ended on the 10-liter bags. I presume this could be used to dry clothes.
Each bag comes with quite a set of straps. My initial thought was, “Ugh, those are a lot of straps.” There are four nylon loop straps designed to attach the center bag to the bike under the seat. The length of each strap is adjusted using a slider clip. Kriega tells you to loop the loose end of the strap back through the clip for added security. I did not do this last step, but the bags seemed to hold well enough.

The attachment points on the bags are sewn in very solidly. Still, I was concerned they might get overstressed and rip out. It turned out this was not an issue. Not a single thread has come loose. These bags are, indeed, very sturdy. But, man, it seems like a lot of straps.
A word on packing
I have had little luck with using stuff-sack-style luggage in the past. Inevitably, the item I want to retrieve falls to the bottom of the bag, leaving me cursing, with all my belongings strewn madly about at a gas station, as friends look on judgmentally. I was introduced to the idea of using nylon bags to organize related items and then stuffing those into the stuff sacks. This makes all the difference in the world when using this kind of luggage system. I use smaller bags to hold folded clothes, cables and chargers, and other items, and this greatly reduces the amount of fumbling and rummaging necessary to find a given thing. I strongly suggest using nylon, not plastic, bags, to segregate your belongings, because nylon slides more easily.
Mounting the system
Attaching these bags to the bike involves quite a few steps. First, the nylon loop straps need to be attached to the bike. They are intended to go under the seat, with the loop part just sticking out past the edge of the seat. I had easy mount points on the outside so I just attached mine to the luggage rail and hand hold. Fortunately, this step only needs to be done rarely.
Now on to the steps that have to be performed every day:
1. As is the case with all stuff sack style bags, after you've crammed your belongings into them, you have to fold the top over and secure it. You typically want to get three folds before securing the end, to ensure the sack remains waterproof.
2. There are two quick-release clips on each side that clip into attachment points on the sides of the bags.
3. Then there is a single strap that loops over the end.

5. Kriega suggests looping the top strap of the 10-liter bags through a loop on the top of the 20-liter bag, presumably for added stability. I did not do this.
6. There are four straps on the 20-liter bag that then attach to the loops on the bike.

I could then slap the Kriega assemblage onto the bike as a unit. Inevitably, the center bag mounting straps would flop over while being schlepped in this way. This would then entail some fumbling to route the straps between the bags.
7. Now all 12 straps have to be cinched tight and the excess carefully tucked into the provided clips, so that your bike doesn't look like some crazed Medusa when underway. I found this step to be the most time-consuming. The problem is that you get everything tightened just right one day, with all the excess neatly clipped, only to have to redo the entire process the next. Much like the way a fast food hamburger shown in the advertisement never seems to match what you get, I never could get them to look as good as they do in the ads.


It seems like I can never get them mounted as neatly on my motorcycle, right, as they are in the advertising photos, left.
Let’s get on the road
The first time I put the bags on the bike, it took me a good 30 minutes to get everything situated and cinched down. After some experience, the process became much easier and I could get everything mounted and be ready to go in a few minutes, but I would skimp on tightening them as much as I was supposed to. Unhooking, adjusting, and then re-hooking 12 straps each time you're trying to get going, especially when there are other riders you're trying not to delay, is not something I found I wanted to do. So I would set everything up and just leave it and only address it when the straps got too loose because the contents of the bags shifted or changed.
The metal hooks proved to me to be the most problematic. They need a good bit of tension to keep them in place, and because I skimped on re-tightening each time, sometimes the hooks would come loose. It was usually one holding the side bags on, but at one point, in New Mexico, riding through 60 mph gusts, one of the mounting hooks came off and was flapping around in the wind. The bags didn't come off or even shift, but really, you should re-tension all the straps each time the bags are put on the bike.
I don't understand why Kreiga didn't use quick release connectors like they do on the other end of the straps. It would make mounting them so much easier and would make tensioning the straps much less critical.
There are very good reasons why these bags are popular, however. The key point, for anything with “Drypack” in the name, is that they are, indeed, totally waterproof. I rode through some torrential downpours and they kept my clothes dry. They are also solidly made. Not a single stitch on the Kreiga bags has come undone after nearly 10,000 miles of abuse that included heat, cold, wind, rain, dust, and my first ever on-pavement crash, when my bike ended up in a ditch with my beloved BMW bags in pieces. I certainly was not kind to these bags and they held up to the abuse admirably, even when I didn’t follow the strapping instructions to the letter and the full weight of the bags and contents was straining a single loop.
I found the top and bottom compartments not to be very useful, because in order to get to their contents, you have to undo straps, and that disturbs the whole system. Getting into the main compartment of the bags while the system is mounted is possible, but again it upsets the tension on the straps and takes a bit of time.
But after some weeks, I strangely become used to it all and it became part ritual, much like tying a banzai tree. And, like tying a banzai tree, I suspect with years of careful meditative practice, you can eventually get your bags to look as good as the ones tied by the masters.
Kreiga UScombo40 Drypack System pros and cons
- Very well made and extremely durable
- Can be mounted on a wide variety of bikes and configured in various ways
- Completely waterproof
- Too many straps!
- Difficult to get to contents when the bags are mounted
- The hooks can come loose unless properly tensioned
| About Yermo Lamers |
|---|
| Yermo has been developing software and riding motorcycles since the age of 7, which is a distressingly long time. He's been across the United States by motorcycle five times. He is the founder and lead developer of Flying Brick Software, LLC, which is behind the Miles By Motorcycle website, a growing motorcycle travel social network. He is a big advocate of responsible and proficient motorcycling and in his spare time coaches friends and, in addition, reluctantly writes on topics tangentially related to motorcycle travel. |